

⚔ Game Maker Tutorials ⚔
Página 1 de 2. • Comparte
Página 1 de 2. • 1, 2 
What game would you like to create?
⚔ Game Maker Tutorials ⚔
Verax Sáb Ago 23, 2014 9:54 am
⚔ GAME MAKER TUTORIALS ⚔
Introduction:
Hello! Welcome to my brand new tutorial series!
As some of you may know, my Programming Tutorials is currently down, and will most likely not be up again in the nearest future. However, I decided to start these tutorials, where we will create games using Game Maker (Lite), to create a game like Zelda I or Super Mario Bros.. These tutorials won't contain any heavy programming, but will rather focus more on the process of creating games itself, game design and using Game Maker as a tool.
Rules:
→ In order to keep this topic clean, please avoid posting here. If needed, a discussion thread can be opened.
→ If you have any questions regarding something, feel free to send me a Personal Message.
FAQ:
Q: Where is the forms?
A: This is a set of tutorials, not a class. These are here simply for the people who want to learn this.
Q: What about homework?
A: There is no homework. You simply mess around with whatever you want to.
Tutorial List:
Beginner Tutorials:
Tutorial I: Setting up our Sprites
Tutorial II: Objects & Movement
Tutorial III: Opitimization
Tutorial IV: Tilesets
Tutorial V: Cameras Control
Tutorial VI: Collision Detection
Tutorial VII: Optimization Two Point O'
Tutorial VIII: Linear Interpolation I
Última edición por Verax el Mar Feb 03, 2015 11:28 pm, editado 5 veces

Verax- Messages : 1139
Data de inscrição : 27/06/2014
Re: ⚔ Game Maker Tutorials ⚔
Verax Sáb Ago 23, 2014 10:02 am
Important Info! :
Since my "Beginner" tutorials are officially done now, I have some info.
First off, I do not know about the interest of these tutorials. Planning and writing all these tutorials takes time, and planning. However, from here on, there will be even more time & planning going into this, and I don't want to continue this if not a single soul is interested. So, before I start planning and writing more, please tell me in one or another way if you want it to continue. If there is no interest, there is nothing more I can do to teach you how to create a game. Using an engine like Game Maker is about how simple it can get. So, if there is no interest, this will be the end of these, and all future tutorials at this site.
Secondly, we will be switching to Game Maker Studio if this tutorial series is to continue, as it is more up-to-date, and looks much nicer.
Apart from that, have a nice day!
Última edición por Verax el Miér Sep 03, 2014 9:13 pm, editado 3 veces
-
Verax - Messages : 1139
Data de inscrição : 27/06/2014
Re: ⚔ Game Maker Tutorials ⚔
Verax Jue Ago 28, 2014 1:58 pm
⚔ GAME MAKER TUTORIALS ⚔
⚔ Tutorial I: Setting Up Our Sprites ⚔
Getting to know the user interface:
So, I've made the decision, based off the poll, to go with a Legend of Zelda game. So, after you've downloaded and booted up Game Maker (GM), you will meet this "GUI":

You will most likely have a different icon, and a more blank screen.
So first off, at the left, you have some folders. The first one is for Sprites, which is basically a picture you can move around on the screen. (enemies, players etc.) To create a new Sprite, you can simply click on the red pacman at top.
Next up we have Sounds, which I'm sure you know what is. To create a new sound effect/background music, click on the speaker icon at the top bar.
Going further on we have Backgrounds. This is the folder where all your pictures that will be used as backgrounds go. To create a new Background, click the icon of a picture at the top bar.
Now, I won't cover what Paths, Fonts or Time Lines is yet, since it will only confuse you at the moment. They are also used for more custom & advanced things, so therefore I will get back to them when they become relevant.
Scripts is where all your scripts goes. A Script is basically a set of code. Game Maker uses the language named Game Maker Language for these scripts.
The Objects folder will contain all of our Objects, which is generally speaking an instance of something. But for now, look upon them as an item.
Finally, the Rooms folder is where all of our rooms/stages/levels/maps will go.
Also, to start your game, press the green arrow icon at the top bar.
(You can hover your mouse over all the icons to get to know what they do.)
Using spritesheets to create sprites:
So, with the basics of the user interface covered, let's create some sprites. If you head down to the Resources section of this tutorial, you will find links to spritesheet downloads from a few zelda game. I will be using the spritesheets from Link's Awakening and Orcale of Ages/Seasons, but you can choose the one(s) you like best.

I will be using this spritesheet for Link. Note that you should give credits to the one who got this sheet together if you release your game for the public. Also note that you cannot make money out of this game. So don't be stupid and get yourself sued or something.
So, with your spritesheet downloaded, go ahead and click the red pacman icon to create a new Sprite. Hit "Edit Sprite", then click "File -> Create from Strip". Then choose your spritesheet. Now, here you can adjust the size of your rectangle, and move around the rectangle. So, let's say that our first sprite will be Link walking up. Then we just place the rectangle around the sprite with Link walking up, and just play around with the size until it seems good. Then hit "Ok".
We now have an image as a sprite of Link walking up. However, in the spritesheet I use, there are two sprites of link walking up. So, in order to create an animation, let's add this image into our sprite too, using the "Add form strip". Basically the same as above, just choosing "Add" instead of "Create" from strip.
With this done, check the "Show preview" box to see your animation in action. You can also set the speed of the animation. I set mine to 5.
So now, we can click away the current window and get back to the previous window, where the "Edit Sprite" button was. Now, here you can also name your sprite. I named mine "LinkUp", but you can name yours whatever you want. Press the "OK" button.
Now, you just have to repeat this three more times in order to add a sprite for all directions Link can move. With that done, we have made the basic sprites for Link, and we will get him to move on our screen next time. Until then, see you!
Resources:
The Legend of Zelda (NES)
Link's Awakening (GB)
Orcale of Seasons/Ages (GB)
A Link to The Past (SNES)
⚔ Tutorial I: Setting Up Our Sprites ⚔
Getting to know the user interface:
So, I've made the decision, based off the poll, to go with a Legend of Zelda game. So, after you've downloaded and booted up Game Maker (GM), you will meet this "GUI":
You will most likely have a different icon, and a more blank screen.
So first off, at the left, you have some folders. The first one is for Sprites, which is basically a picture you can move around on the screen. (enemies, players etc.) To create a new Sprite, you can simply click on the red pacman at top.
Next up we have Sounds, which I'm sure you know what is. To create a new sound effect/background music, click on the speaker icon at the top bar.
Going further on we have Backgrounds. This is the folder where all your pictures that will be used as backgrounds go. To create a new Background, click the icon of a picture at the top bar.
Now, I won't cover what Paths, Fonts or Time Lines is yet, since it will only confuse you at the moment. They are also used for more custom & advanced things, so therefore I will get back to them when they become relevant.
Scripts is where all your scripts goes. A Script is basically a set of code. Game Maker uses the language named Game Maker Language for these scripts.
The Objects folder will contain all of our Objects, which is generally speaking an instance of something. But for now, look upon them as an item.
Finally, the Rooms folder is where all of our rooms/stages/levels/maps will go.
Also, to start your game, press the green arrow icon at the top bar.
(You can hover your mouse over all the icons to get to know what they do.)
Using spritesheets to create sprites:
So, with the basics of the user interface covered, let's create some sprites. If you head down to the Resources section of this tutorial, you will find links to spritesheet downloads from a few zelda game. I will be using the spritesheets from Link's Awakening and Orcale of Ages/Seasons, but you can choose the one(s) you like best.
I will be using this spritesheet for Link. Note that you should give credits to the one who got this sheet together if you release your game for the public. Also note that you cannot make money out of this game. So don't be stupid and get yourself sued or something.
So, with your spritesheet downloaded, go ahead and click the red pacman icon to create a new Sprite. Hit "Edit Sprite", then click "File -> Create from Strip". Then choose your spritesheet. Now, here you can adjust the size of your rectangle, and move around the rectangle. So, let's say that our first sprite will be Link walking up. Then we just place the rectangle around the sprite with Link walking up, and just play around with the size until it seems good. Then hit "Ok".
We now have an image as a sprite of Link walking up. However, in the spritesheet I use, there are two sprites of link walking up. So, in order to create an animation, let's add this image into our sprite too, using the "Add form strip". Basically the same as above, just choosing "Add" instead of "Create" from strip.
With this done, check the "Show preview" box to see your animation in action. You can also set the speed of the animation. I set mine to 5.
So now, we can click away the current window and get back to the previous window, where the "Edit Sprite" button was. Now, here you can also name your sprite. I named mine "LinkUp", but you can name yours whatever you want. Press the "OK" button.
Now, you just have to repeat this three more times in order to add a sprite for all directions Link can move. With that done, we have made the basic sprites for Link, and we will get him to move on our screen next time. Until then, see you!
Resources:
The Legend of Zelda (NES)
Link's Awakening (GB)
Orcale of Seasons/Ages (GB)
A Link to The Past (SNES)
-
Verax - Messages : 1139
Data de inscrição : 27/06/2014
Re: ⚔ Game Maker Tutorials ⚔
Verax Vie Ago 29, 2014 8:42 am
⚔ GAME MAKER TUTORIALS ⚔
⚔ Tutorial II: Objects & Movement ⚔
Creating a player object:
So, we have our four sprites ready to go. Now we can actually create an Object. Click the icon with a blue circle, and you will get a new object. Now, this menu may be a little confusing, and it's way too much to cover everything in one tutorial.
So, first things first. Name your object. (I named mine Link, but you can name it whatever you want). Just below the name, you should see a box named "Sprite", containing a "New" and "Edit" button. We want to press the button right over the "Edit" button. (The icon with a list and a cursor) Here we want to choose the sprite used for this object, which will be LinkDown.
Now over to the confusing stuff. Press the "Add Event" button, and click "Create". This should add a "Create" event for us. Now, press "Add Event" -> "Step" -> "Step", which will add a "Step" event. Now, whatever we put into our Create event will be executed once our Link object is created. The Step event on another hand, is basically a confusing name for an update method. In Game Maker, So basically, Step will be executed a lot of times every second.
So, let's code something! This will be simple code that is easy to follow, so no worries! To do this, press "Control" on the side bar the the right, and under "Code", drag the Execute Code action (The square with a blank paper) into the Actions tab with the Create event selected. And we get a scary codebox. No worries. What we want to do here is to set the speed of Link to 0. This is done by typing:
Very simple. speed is actually a variable already created in the engine, which, you guessed it, controls the speed of something. So, we set the speed of Link to 0, so that when we start our game, he won't move or anything.
Now, drag an Execute Code action into our Step event. Here we want to control the movement of Link.
Whoa! Simple code, you said? Well, this is quite simple. We start off by checking if a certain key is pressed with the "keyboard_check" method. Then we set the direction, according to what key was pressed. Then we set our speed to 3, which is a pretty nice speed, and our image speed to 0.3/.3, which sets the speed of the animation. Then we change our sprite according to the key pressed.
After checking if any key was pressed, we check if any key was released. Now, this is a little unpractical coded, since we could have done everything in one if statement, but it's easier to get the point if we do it like this. When a key is released, we set the speed to 0, so Link won't move, and set the image speed to 0, so that the walking animation won't play. Then we change our sprite, which is actually not needed.
Our very first room:
Alright, so with a functional player object, let's create a room! Simply press the icon next to the blue circle, and we have a new room. You will see a grid, and our Link object. Simply click at one of the places in the grid to place our object. Then head over to the "Settings" tab, and name your room. I named my room "Test Room". Then exit out of the window and press the green arrow to start your game. Try to press the up and down arrow keys to move. (We didn't program the left & right movement.) Simply press the red cross to exit the game and get back to the makin'.
You may have noticed that Link is a little small. And we don't want that. So, what are we going to do?
Let's head back over at our code in the Step event. At the very top, add these lines of code:
Also, in our Create event code, add this under the speed = 0:
Then save and run your game and, voila! It looks much better!
What now?:
So, we have a character that can move. If you want to, add left & right movement (shouldn't be too hard, just copy the up and right code and change the key.) We will have a look at some optimization in our code next time, and maybe look into some more things. Until then, see ya!
⚔ Tutorial II: Objects & Movement ⚔
Creating a player object:
So, we have our four sprites ready to go. Now we can actually create an Object. Click the icon with a blue circle, and you will get a new object. Now, this menu may be a little confusing, and it's way too much to cover everything in one tutorial.
So, first things first. Name your object. (I named mine Link, but you can name it whatever you want). Just below the name, you should see a box named "Sprite", containing a "New" and "Edit" button. We want to press the button right over the "Edit" button. (The icon with a list and a cursor) Here we want to choose the sprite used for this object, which will be LinkDown.
Now over to the confusing stuff. Press the "Add Event" button, and click "Create". This should add a "Create" event for us. Now, press "Add Event" -> "Step" -> "Step", which will add a "Step" event. Now, whatever we put into our Create event will be executed once our Link object is created. The Step event on another hand, is basically a confusing name for an update method. In Game Maker, So basically, Step will be executed a lot of times every second.
So, let's code something! This will be simple code that is easy to follow, so no worries! To do this, press "Control" on the side bar the the right, and under "Code", drag the Execute Code action (The square with a blank paper) into the Actions tab with the Create event selected. And we get a scary codebox. No worries. What we want to do here is to set the speed of Link to 0. This is done by typing:
- Código:
speed = 0
Very simple. speed is actually a variable already created in the engine, which, you guessed it, controls the speed of something. So, we set the speed of Link to 0, so that when we start our game, he won't move or anything.
Now, drag an Execute Code action into our Step event. Here we want to control the movement of Link.
- Código:
if keyboard_check(vk_down) {
    direction = 270
    speed = 3
    image_speed = .3
    sprite_index = Link_Down
}
if keyboard_check(vk_up) {
    direction = 90
    speed = 3
    image_speed = .3
    sprite_index = Link_Up
}
if keyboard_check_released(vk_down) {
    speed = 0
    image_speed = 0
    sprite_index = Link_Down
}
if keyboard_check_released(vk_up) {
    speed = 0
    image_speed = 0
    sprite_index = Link_Up
}
Whoa! Simple code, you said? Well, this is quite simple. We start off by checking if a certain key is pressed with the "keyboard_check" method. Then we set the direction, according to what key was pressed. Then we set our speed to 3, which is a pretty nice speed, and our image speed to 0.3/.3, which sets the speed of the animation. Then we change our sprite according to the key pressed.
After checking if any key was pressed, we check if any key was released. Now, this is a little unpractical coded, since we could have done everything in one if statement, but it's easier to get the point if we do it like this. When a key is released, we set the speed to 0, so Link won't move, and set the image speed to 0, so that the walking animation won't play. Then we change our sprite, which is actually not needed.
Our very first room:
Alright, so with a functional player object, let's create a room! Simply press the icon next to the blue circle, and we have a new room. You will see a grid, and our Link object. Simply click at one of the places in the grid to place our object. Then head over to the "Settings" tab, and name your room. I named my room "Test Room". Then exit out of the window and press the green arrow to start your game. Try to press the up and down arrow keys to move. (We didn't program the left & right movement.) Simply press the red cross to exit the game and get back to the makin'.
You may have noticed that Link is a little small. And we don't want that. So, what are we going to do?
Let's head back over at our code in the Step event. At the very top, add these lines of code:
- Código:
image_xscale = 2
image_yscale = 2
Also, in our Create event code, add this under the speed = 0:
- Código:
image_speed = 0
Then save and run your game and, voila! It looks much better!
What now?:
So, we have a character that can move. If you want to, add left & right movement (shouldn't be too hard, just copy the up and right code and change the key.) We will have a look at some optimization in our code next time, and maybe look into some more things. Until then, see ya!
-
Verax - Messages : 1139
Data de inscrição : 27/06/2014
Re: ⚔ Game Maker Tutorials ⚔
Verax Vie Ago 29, 2014 11:20 am
⚔ GAME MAKER TUTORIALS ⚔
⚔ Tutorial III: Optimization ⚔
Begin Step:
Welcome back! Today we are going to make our code more neat and better, and we will add left and right movement.
So, start by adding a "Step" -> "Begin Step" event to Link. The Begin Step event is the very first thing that happens in every Step/Update. After Begin Step is called, some technical stuff like keyboard polling and alarm handling happens, then our Step event will be executed. Finally, we have the "End Step" event, which happens after position updates and collision detection, but we are not going to use that yet.
So, add an Execute Code action to the Begin Step event. Here we want to handle our image scaling and prepare the keyboard input handling:
Should be familiar stuff, huh? We basically assing a value to every variable. This could be even more compact, but let's stick with this for now.
Next up, head to the Step code. Let's do some changes here:
Now, let me explain a little here. Instead of calling the keyboard_check methods here, we already have the variable containg it from the Begin Step code. Also, we have removed the Direction and Speed variables, and replaced them with x and y position control. Basically the same result, but more precise & less code. We have also made it so that we will avoid diagonal movement with the help of adding some "else" keywords in or code.
Also, instead of having four new if statements in our released key handling, we basically check if the left key or right key or up key or down key is released all in one statement. (two pipe keys = or). If any key is released, then we won't change the x or y position, and we will set the image speed to 0.
With this done, head over to the code in the Create event. Change it to this:
We remove the speed variable since we aren't using it any longer. Instead we set the image speed to 0.
X and Y Movement:
When we update our x or y position, in our case with 3, what actually happens? You see, what you see at your monitor is made up by pixels. Usually, a monitor is about 1000 pixels long and 800 pixels high, but often more. Our x and y position resembles a point at the monitor/game window. x0 y0 is the top left corner. When we update our x position, with say, adding 3 to it, our character moves 3 pixels down on the game window. The same goes with y.
Some coding done in this tutorial, but it's not too advanced. In the next couple of tutorials, we will have a look at using tileset, controlling the camera and having a peek at collision detection. But until then, see ya!
⚔ Tutorial III: Optimization ⚔
Begin Step:
Welcome back! Today we are going to make our code more neat and better, and we will add left and right movement.
So, start by adding a "Step" -> "Begin Step" event to Link. The Begin Step event is the very first thing that happens in every Step/Update. After Begin Step is called, some technical stuff like keyboard polling and alarm handling happens, then our Step event will be executed. Finally, we have the "End Step" event, which happens after position updates and collision detection, but we are not going to use that yet.
So, add an Execute Code action to the Begin Step event. Here we want to handle our image scaling and prepare the keyboard input handling:
- Código:
//Set Scale
image_xscale = 2;
image_yscale = 2;

//Get Movement Variables
move_left  = keyboard_check(vk_left);
move_right = keyboard_check(vk_right);
move_up    = keyboard_check(vk_up);
move_down  = keyboard_check(vk_down);

move_left_r  = keyboard_check_released(vk_left);
move_right_r = keyboard_check_released(vk_right);
move_up_r    = keyboard_check_released(vk_up);
move_down_r  = keyboard_check_released(vk_down);
Should be familiar stuff, huh? We basically assing a value to every variable. This could be even more compact, but let's stick with this for now.
Next up, head to the Step code. Let's do some changes here:
- Código:
//Handle Movement
if (move_down) {
    y += 3;
    image_speed = .3;
    sprite_index = Link_Down;
} else
if (move_up) {
    y -= 3;
    image_speed = .3;
    sprite_index = Link_Up;
} else
if (move_left) {
    x -= 3;
    image_speed = .3;
    sprite_index = Link_Left;
}  else
if (move_right) {
    x += 3;
    image_speed = .3;
    sprite_index = Link_Right;
}

//If a Movement Key is Released
if (move_left_r || move_right_r || move_up_r || move_down_r) {
    image_speed = 0;
}
Now, let me explain a little here. Instead of calling the keyboard_check methods here, we already have the variable containg it from the Begin Step code. Also, we have removed the Direction and Speed variables, and replaced them with x and y position control. Basically the same result, but more precise & less code. We have also made it so that we will avoid diagonal movement with the help of adding some "else" keywords in or code.
Also, instead of having four new if statements in our released key handling, we basically check if the left key or right key or up key or down key is released all in one statement. (two pipe keys = or). If any key is released, then we won't change the x or y position, and we will set the image speed to 0.
With this done, head over to the code in the Create event. Change it to this:
- Código:
image_speed = 0;
We remove the speed variable since we aren't using it any longer. Instead we set the image speed to 0.
X and Y Movement:
When we update our x or y position, in our case with 3, what actually happens? You see, what you see at your monitor is made up by pixels. Usually, a monitor is about 1000 pixels long and 800 pixels high, but often more. Our x and y position resembles a point at the monitor/game window. x0 y0 is the top left corner. When we update our x position, with say, adding 3 to it, our character moves 3 pixels down on the game window. The same goes with y.
Some coding done in this tutorial, but it's not too advanced. In the next couple of tutorials, we will have a look at using tileset, controlling the camera and having a peek at collision detection. But until then, see ya!
-
Verax - Messages : 1139
Data de inscrição : 27/06/2014
Re: ⚔ Game Maker Tutorials ⚔
Verax Dom Ago 31, 2014 12:05 pm
⚔ GAME MAKER TUTORIALS ⚔
⚔ Tutorial IV: Tilesets ⚔
Creating a Tileset:
Welcome back everybody! Today, we are going to make our game look a lot better. So, until now, our game have only been Link walking on a gray and boring background. Why not change that?
This can be done either by using a background image, or tilesets. Both works fine, but I prefer tilesets, because they are more flexible. So, here is the tileset I got:

The overworld tileset from Link's Awakening.
With that in hand, create a new Background in Game Maker, hit "Load Background" and choose the tileset. Name it whatever you want. Then check the box named "Use as tile set", which opens up for a lot more options. For my tileset, I calculated that tile width & tile height was 16 pixels. It also had a border between the tilesets, so I set the Vertical and Horizontal Separation to 1 pixel. Then I left Hor. & Ver. Offset at 1.
Most of these options aren't hard to understand. Tile width & tile height should be set to the size of your tiles. If they are not split in any way, you can just leave the separation at 0. Offsets should almost always be left at 0, unless you have starting borders..
With this done, hit "Ok", and head into our room. Here, head over at the "Tiles" section, and you will see your beautiful tileset, ready to go. Simply click the tile you want, then click at the grid in the room to place it. From here you can just use your creativity. (Don't overdo it though, we will do some modifications later). With some tiles placed, save and run your game.
Sir, we have a problem:
At once you will notice a problem. Link is twice the size of the tiles. You can walk on houses and trees. But apart from that, and a few minor details, it shouldn't look too shabby.
Next time, we will be fixing the issue with Link being huge and tiles small, and have a peek at using views/cameras.
Until then, see ya!
Resources:
LA Tileset
You can find more tilesets by using google, or just browsing the spriters resource.
⚔ Tutorial IV: Tilesets ⚔
Creating a Tileset:
Welcome back everybody! Today, we are going to make our game look a lot better. So, until now, our game have only been Link walking on a gray and boring background. Why not change that?
This can be done either by using a background image, or tilesets. Both works fine, but I prefer tilesets, because they are more flexible. So, here is the tileset I got:
The overworld tileset from Link's Awakening.
With that in hand, create a new Background in Game Maker, hit "Load Background" and choose the tileset. Name it whatever you want. Then check the box named "Use as tile set", which opens up for a lot more options. For my tileset, I calculated that tile width & tile height was 16 pixels. It also had a border between the tilesets, so I set the Vertical and Horizontal Separation to 1 pixel. Then I left Hor. & Ver. Offset at 1.
Most of these options aren't hard to understand. Tile width & tile height should be set to the size of your tiles. If they are not split in any way, you can just leave the separation at 0. Offsets should almost always be left at 0, unless you have starting borders..
With this done, hit "Ok", and head into our room. Here, head over at the "Tiles" section, and you will see your beautiful tileset, ready to go. Simply click the tile you want, then click at the grid in the room to place it. From here you can just use your creativity. (Don't overdo it though, we will do some modifications later). With some tiles placed, save and run your game.
Sir, we have a problem:
At once you will notice a problem. Link is twice the size of the tiles. You can walk on houses and trees. But apart from that, and a few minor details, it shouldn't look too shabby.
Next time, we will be fixing the issue with Link being huge and tiles small, and have a peek at using views/cameras.
Until then, see ya!
Resources:
LA Tileset
You can find more tilesets by using google, or just browsing the spriters resource.
-
Verax - Messages : 1139
Data de inscrição : 27/06/2014
Re: ⚔ Game Maker Tutorials ⚔
Verax Dom Ago 31, 2014 2:07 pm
⚔ GAME MAKER TUTORIALS ⚔
⚔ Tutorial V: Camera Control ⚔
Creating a View:
Alright, first problems first; Link is twice as big as the tiles, and it looks bad. Really bad. Now, there is no way we can scale the tileset in general the same way as we scaled Link. So, what shall we do?
Instead of scaling everything, we create a custom View, that zooms in on Link and the area around him. So, head to our room, go to the "Views" tab, and have a quick glance at the settings. First of all, check "Enable use of Views". This will simply allow us to use customized views/cameras. Now, you will see that we have 8 Views (0-7). We will only use View 0 for now. However, if you're creating a multiplayer game with split screens for example, you can use 2 - 4 views to achieve that. Just click on View 0 for now. Finally, check "Visible when room starts", so that View 0 will be active when our game launches.
As for "View in Room", i set X and Y to 0, and W & H to 192. This will create a view that is placed at the upper left corner on the game window, and is 192 pixels long and 192 pixels high. (My calculations was that I want 1 "screen" to be 12 tiles long & high. 12 * 16 = 192)
In "Port on Screen", i set X & Y to 0, and W & H to 480. This defines how we port our view to the screen. I wanted to zoom in on my screen with 2,5 times. (192 * 2,5 = 480). So I will port our view to the screen with a zoom of *2,5.
Finally, I wanted to camera to follow Link, so I chose Link as the object to follow. The I set Hbor (HorizontalBorder) and Vbor (VeticalBorder) to 96. (192/2 = 96) Then i left the "sp"s at -1.
Now you can safely remove the scaling code in the "Begin Step" event. Then run your game, and voila! Looks beautiful. The camera also follows Link when you move around.
Problems:
Now, there is a new problem. Link moves a little fast. Don't worry though, we will have a look at it in a future "Optimization" tutorial here. Link can still walk over trees and house roofs and stuff, which is a problem that is annoying. So, in the next tutorial, we will have a look at how to fix that. Until then, see ya!
Última edición por Verax el Dom Ago 31, 2014 2:40 pm, editado 1 vez
-
Verax - Messages : 1139
Data de inscrição : 27/06/2014
Re: ⚔ Game Maker Tutorials ⚔
Verax Dom Ago 31, 2014 2:39 pm
⚔ GAME MAKER TUTORIALS ⚔
⚔ Tutorial VI: Collision Detection ⚔
Repos error.
The tutorial will hopefully be back soon though!
⚔ Tutorial VI: Collision Detection ⚔
Repos error.
The tutorial will hopefully be back soon though!
Última edición por Verax el Mar Jun 23, 2015 8:42 pm, editado 6 veces
-
Verax - Messages : 1139
Data de inscrição : 27/06/2014
Re: ⚔ Game Maker Tutorials ⚔
Verax Lun Sep 01, 2014 12:47 pm
⚔ GAME MAKER TUTORIALS ⚔
⚔ Tutorial VII: Optimization Two Point O' ⚔
Fixing collision problems:
As you may have noticed, Link moves a little shabby when he is close to the borders on your map. He may get stuck, and the controls feels horrible. The problem here is not the Border object itself, but it is rather:
A: The way we are handling the collision.
B: The collision box of our sprite.
Let's fix problem B. I got myself a new sheet for Link, which is much better to work with, because it is more split up, which opens for better collision boxes. I replaced my Link sprites with the sprites from this sheet. (The sprites looks the same.)
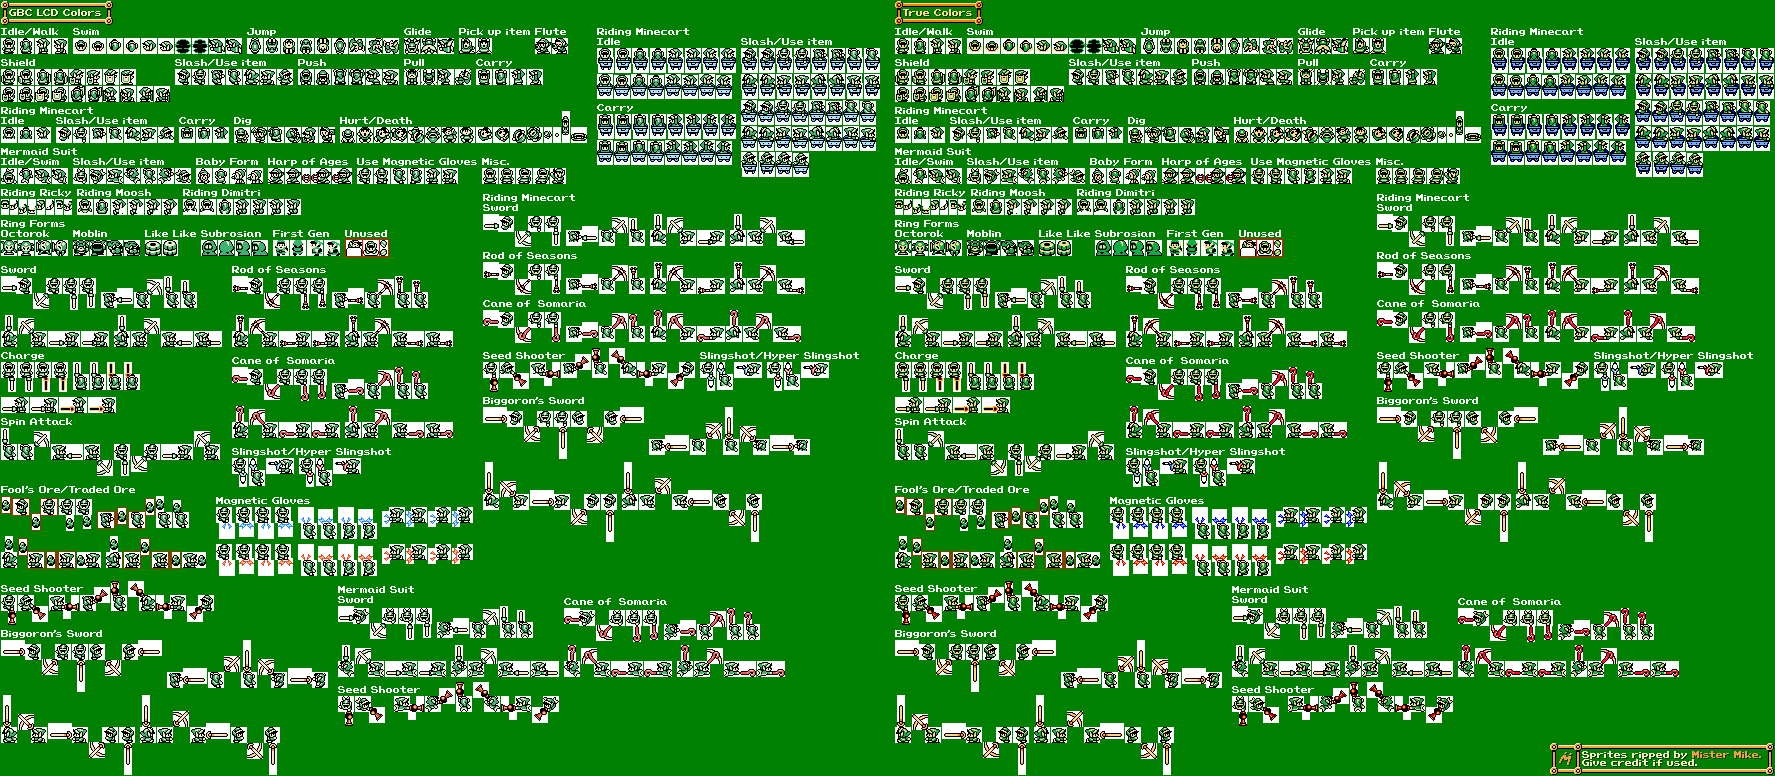
Our new spritesheet of Link.
After that, I unchecked the "Precise collision checking" at every sprite. (This option is found in the sprite edit window). Then I set the Bounding box at "Manual", with Right & Bottom set to 16, and the rest at 0. This means that we are now checking collision at a 16x16 area, instead of only around link himself, which is about 12x15. We won't do anything with case A yet.
Easy Movement Speed Changing:
Now, Link moves a little too fast. We could change the increment in x and y manually 4 times in the code, but that is a lot of work if we have to do that often, just to test a new speed. So, we can create a variable that can be changed in the script, that changes the x and y increment too. So, I changed my script at "Step":
The cool thing here is that if we are to create an item like "Running boots" or something, we could make the movement speed variable global, and change it so that when this item is used, it will increase our movement speed. But that is a topic for later.
So, with these things fixed, we are ready to move on! Our game is starting to actually feel like a Zelda game! However, we are still missing a lot. I will mark this tutorial as the end of the "Beginner" tutorials, as we are going to move onto some more advanced stuff like timers, pathfinding, custom items etc.
So, the important thing is that you have the basics covered, both with skills and the game itself. Until the next set of "Intermediate" tutorials is up, see ya!
⚔ Tutorial VII: Optimization Two Point O' ⚔
Fixing collision problems:
As you may have noticed, Link moves a little shabby when he is close to the borders on your map. He may get stuck, and the controls feels horrible. The problem here is not the Border object itself, but it is rather:
A: The way we are handling the collision.
B: The collision box of our sprite.
Let's fix problem B. I got myself a new sheet for Link, which is much better to work with, because it is more split up, which opens for better collision boxes. I replaced my Link sprites with the sprites from this sheet. (The sprites looks the same.)
Our new spritesheet of Link.
After that, I unchecked the "Precise collision checking" at every sprite. (This option is found in the sprite edit window). Then I set the Bounding box at "Manual", with Right & Bottom set to 16, and the rest at 0. This means that we are now checking collision at a 16x16 area, instead of only around link himself, which is about 12x15. We won't do anything with case A yet.
Easy Movement Speed Changing:
Now, Link moves a little too fast. We could change the increment in x and y manually 4 times in the code, but that is a lot of work if we have to do that often, just to test a new speed. So, we can create a variable that can be changed in the script, that changes the x and y increment too. So, I changed my script at "Step":
- Código:
//Default Movement Speed
def_move_spd = 2;

//Handle Movement
if (move_down) {
    y += def_move_spd;
    image_speed = .3;
    sprite_index = Link_Down;
} else
if (move_up) {
    y -= def_move_spd;
    image_speed = .3;
    sprite_index = Link_Up;
} else
if (move_left) {
    x -= def_move_spd;
    image_speed = .3;
    sprite_index = Link_Left;
}  else
if (move_right) {
    x += def_move_spd;
    image_speed = .3;
    sprite_index = Link_Right;
}

//If a Movement Key is Released
if (move_left_r || move_right_r || move_up_r || move_down_r) {
    image_speed = 0;
}
The cool thing here is that if we are to create an item like "Running boots" or something, we could make the movement speed variable global, and change it so that when this item is used, it will increase our movement speed. But that is a topic for later.
So, with these things fixed, we are ready to move on! Our game is starting to actually feel like a Zelda game! However, we are still missing a lot. I will mark this tutorial as the end of the "Beginner" tutorials, as we are going to move onto some more advanced stuff like timers, pathfinding, custom items etc.
So, the important thing is that you have the basics covered, both with skills and the game itself. Until the next set of "Intermediate" tutorials is up, see ya!
-
Verax - Messages : 1139
Data de inscrição : 27/06/2014
Página 1 de 2. • 1, 2
» Ω Verax's Programming Tutorials Ω
» Yes or No? [GAME]
» The POP game
» The Ban Game
» @~@~@Shortcut Game @~@~@
» Yes or No? [GAME]
» The POP game
» The Ban Game
» @~@~@Shortcut Game @~@~@
Página 1 de 2.
Permisos de este foro:
No puedes responder a temas en este foro.|
|
|